
图片/图形
商品购物添加购物车界面设计
 PetitQ
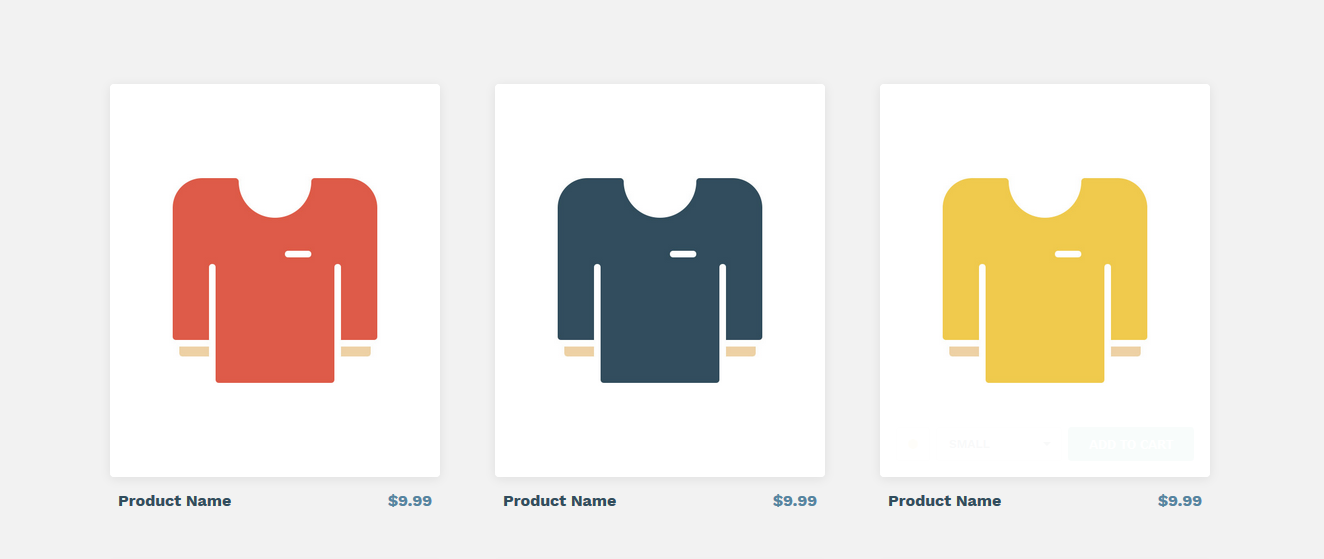
这是一款简单实用的商品购物和添加购物车界面设计方案。用户可以在商品购物界面中预览各种型号、颜色、尺寸的商品。然后通过点击添加到购物车按钮就可以将该商品添加到购物车中,操作简单直观。在传统的购物网站中,用户在商品展示界面看中了一件商品之后,点击这件商品的缩略图,然后可以键入到对应水平的子页面中。在这个子页面中,用户可以选择查看一些商品的属性,然后把商品添加到购物车中。但是在这个购物车界面设计中,用户可以直接在购物界面查看商品的属性,并直接将商品添加到购物车中,简化了用户的操作,大大提升了用户的体验度。通过在商品预览图界面添加“快速添加到购物车”按钮,可以减少用户的操作步骤,提升用户体验,增加转化率。
HTML 结构
该购物界面的 HTML 结构使用一个无序列表来制作。每一个无序列表项中又包含一个无序列表,由于制作商品的图片画廊。div.cd-customization 是包含商品的属性和“添加到购物车”按钮的面板。div.cd-item-info 是商品的名称和价格。
也想出现在这里?联系我们吧

<ul class="cd-gallery">
<li>
<div class="cd-single-item">
<a href="#0">
<ul class="cd-slider-wrapper">
<li class="selected"><img src="img/thumb-1.jpg" alt="Preview image"></li>
<li><img src="img/thumb-2.jpg" alt="Preview image"></li>
<!-- other product images here -->
</ul>
</a>
<div class="cd-customization">
<div class="color" data-type="select">
<ul>
<li class="color-1 active">color-1</li>
<li class="color-2">color-2</li>
<!-- other product colors here -->
</ul>
</div>
<div class="size" data-type="select">
<ul>
<li class="small active">Small</li>
<li class="medium">Medium</li>
<!-- other product sizes here -->
</ul>
</div>
<button class="add-to-cart">
<em>Add to Cart</em>
<svg x="0px" y="0px" width="32px" height="32px" viewBox="0 0 32 32">
<path stroke-dasharray="19.79 19.79" stroke-dashoffset="19.79" fill="none" stroke="#FFFFFF" stroke-width="2" stroke-linecap="square" stroke-miterlimit="10" d="M9,17l3.9,3.9c0.1,0.1,0.2,0.1,0.3,0L23,11"/>
</svg>
</button>
</div> <!-- .cd-customization -->
<button class="cd-customization-trigger">Customize</button>
</div> <!-- .cd-single-item -->
<div class="cd-item-info">
<b><a href="#0">Product Name</a></b>
<em>$9.99</em>
</div> <!-- cd-item-info -->
</li>
<!-- other list items here -->
</ul> <!-- cd-gallery -->
CSS 样式
对于商品的图片画廊,默认情况下,列表项使用绝对定位,并被移动到它的父元素.cd-gallery 之外,因此它们是不可见的。它们使用了两个 class:.selected 用于添加到列表项的第一项,使其可见,.move-left,图片向左移动,使其不可见。
.cd-slider-wrapper {
position: relative;
overflow: hidden;
}.cd-slider-wrapper li {
position: absolute;
top: 0;
left: 0;
visibility: hidden;
/* by default, move the product image to the right*/transform: translateX(100%);
transition: transform 0.3s 0s, visibility 0s 0.3s;
}.cd-slider-wrapper li.selected {
/* this is the visible product image */position: relative;
visibility: visible;
z-index: 1;
transform: translateX(0);
transition: transform 0.3s 0s, visibility 0s 0s;
}.cd-slider-wrapper li.move-left {
/* move the product image to the left */transform: translateX(-100%);
}
.cd-customization 元素在用户用鼠标滑过商品缩略图时才被显示出来。它使用绝对定位并放置在父元素.cd-single-item 的下面。为了创建自定义选项(商品的颜色和尺寸),这里使用了不同的<ul>元素,它们都被包裹在 div[data-type="select"]元素中。<ul>元素使用绝对定位,并相对于他们的父元素居中。它们的父元素 div[data-type="select"]有固定的高度(34px)以及 overflow:hidden 属性。无序列表中的每一个列表项的高度都和 div[data-type="select"]相同,因此默认情况下,只有被选择的项是可见的。当用户点击了某个自定义选项时,div[data-type="select"]的 overflow 属性被设置为可见,这样整个<ul>元素都被显示出来。
.cd-customization {
position: absolute;
left: 0;
bottom: 0;
width: 100%;
visibility: hidden;
opacity: 0;
}.no-touch .cd-single-item:hover .cd-customization {
/* product customization visible */pointer-events: auto;
visibility: visible;
opacity: 1;
}.cd-customization .color, .cd-customization .size {
height: 34px;
position: relative;
overflow: hidden;
}.cd-customization .color ul, .cd-customization .size ul {
display: inline-block;
position: absolute;
left: 50%;
top: 50%;
transform: translateX(-50%) translateY(-50%);
width: 100%;
}.cd-customization .color.is-open, .cd-customization .size.is-open {
/* color/size list open - make ul element visible */overflow: visible;
}
为了确保被选择的<li>元素一直可见,插件中通过创建.selected-n class 对<ul>元素中的列表项进行了重新排列。例如:当第 3 个列表项被选择的时候,.selected-3 会被添加到 div[data-type="select"]中。
.cd-customization .color.selected-3 ul li:first-of-type,
.cd-customization .size.selected-3 ul li:first-of-type {
/* third option selected in the ul.color/ul.size list */transform: translateY(0);
}.cd-customization .color.selected-3 ul li:nth-of-type(2),
.cd-customization .size.selected-3 ul li:nth-of-type(2) {
transform: translateY(100%);
}.cd-customization .color.selected-3 ul li:nth-of-type(3),
.cd-customization .size.selected-3 ul li:nth-of-type(3) {
transform: translateY(-100%);
}
“添加到购物车”按钮.add-to-cart 由一个<em>元素(按钮上的文本)和一个 SVG(check 图标)组成。默认情况下,图标是不可见的。当商品被添加到购物车的时候,.add-to-cart 按钮被添加了.is-added class:此时<em>元素被隐藏(移动到左边),SVG 图标被移动回中间,然后开始绘制动画。
.cd-customization .add-to-cart em {
/* this is the button text message */position: absolute;
top: 0;
left: 0;
width: 100%;
height: 100%;
}.cd-customization .add-to-cart svg {
/* this is the check icon */position: absolute;
left: 50%;
top: 50%;
width: 100%;
/* move the icon on the right - outside the button */transform: translateX(50%) translateY(-50%);
}.cd-customization .add-to-cart.is-added em {
/* product added to the cart - hide text message on the left with no transition*/color: transparent;
transform: translateX(-100%);
}.cd-customization .add-to-cart.is-added svg {
/* product added to the cart - move the svg back inside the button */transform: translateX(-50%) translateY(-50%);
}
SVG 图标的绘制动画使用的是 stroke-dasharray 和 stroke-dashoffset 属性。如果你对 SVG 感兴趣,可以点击这里查看关于 SVG 教程。
<svg x="0px" y="0px" width="32px" height="32px" viewBox="0 0 32 32">
<path stroke-dasharray="19.79 19.79" stroke-dashoffset="19.79" fill="none" stroke="#FFFFFF" stroke-width="2" stroke-linecap="square" stroke-miterlimit="10" d="M9,17l3.9,3.9c0.1,0.1,0.2,0.1,0.3,0L23,11"/>
</svg>
javascript 代码请参考下载文件。
| 演示地址 | 下载地址 |
专业提供WordPress主题安装、深度汉化、加速优化等各类网站建设服务,详询在线客服!
也想出现在这里?联系我们吧