
图片/图形
CSS3炫酷堆叠图片展示动画特效
 PetitQ
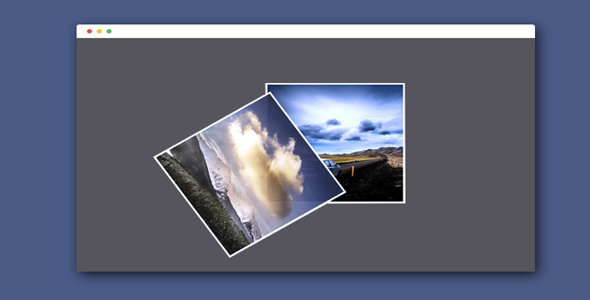
这是一款使用纯 CSS3 制作的炫酷堆叠图片展示动画特效插件。该堆叠图片展示特效开始时所用图片都堆叠在一起,然后会以各种动画效果将最上面一张图片切换掉,有旋转、滑落效果、放大效果、淡入淡出效果、弹射效果等。该堆叠图片展示效果是将一组图片堆叠在一起,然后以各种 CSS 动画效果来切换最上面的一张图片。该特效将使用纯 CSS3 制作,它可以在所有现代浏览器和移动设备上运行。该堆叠图片展示特效将被做成自动播放模式,就像播放幻灯片一样。
HTML 结构
html 结构采用一个 HTML5 的标准结构来制作。
也想出现在这里?联系我们吧

<!DOCTYPE html>
<html>
<head>
<meta charset="utf-8" />
<title>Animated CSS3 Photo Stack | Tutorialzine Demo</title>
<!-- CSS Includes -->
<link href="assets/css/style.css" rel="stylesheet" />
<link href="assets/css/animate.css" rel="stylesheet" />
</head>
<body>
<ul id="photos">
<li><a href="#"
style="background-image:url(...)">Landscape 5</a></li>
<!-- More photos here -->
</ul>
<a href="#" class="arrow previous"></a>
<a href="#" class="arrow next"></a>
<!-- Libraries -->
<script src="http://libs.useso.com/js/jquery/1.9.1/jquery.min.js"></script>
<script src="assets/js/script.js"></script>
</body>
</html>
#photos 的无序列表包含我们将要动画的图片。对于每一张图片,我们使用一个 li 元素来制作,在里面还包含一个 a 标签。图像被设置为链接的背景图片,正如你看到的 CSS 代码,我们使用 background-size 属性来使背景图片的宽度和高度和链接的大小一样大。当你添加更多的图片的时候,你要注意,因为它们的位置是绝对定位的,所以它们时反向显示的(后添加的先显示)。我们在这个堆叠图片展示动画特效中使用了 animate.css-一个强大的 CSS3 动画库。我们还使用了一点 jQuery 代码来控制两个前后导航按钮。css3 堆叠图片展示动画特效
JAVASCRIPT
为了触发 animate.css 给我们的动画效果,我们需要给动画元素添加相应的 CLASS。我们在一张图片展示完毕,必须将它移动到堆叠图片栈的底部,以便能显示下一张图片。下面是我们需要做的事情:
首先,我们要监听两个导航按钮的 click 事件
如果“下一张图片”按钮被点击,我们将随机选择一种 animate.css 效果的 class,将它添加到堆叠图片栈顶部的图片上。(实际上是给 l 列表项的最后一个元素添加)
当图片展示动画结束后,我们将把当前动画 li 元素用 jQuery 的 prependTo 方法移动到其它所有 li 元素的前面。并移除它的 animate.css 效果的 class
对于“前一张图片”按钮,我们做相同的事情。唯一不同的是,在触发动画前,我们将最后一张图片放到图片栈的顶部。
JS 代码
$(function() {
var exits = ['fadeOut', 'fadeOutDown', 'fadeOutUpBig', 'bounceOut', 'bounceOutDown',
'hinge', 'bounceOutUp', 'bounceOutLeft', 'rotateOut', 'rotateOutUpLeft',
'lightSpeedOut', 'rollOut'];
var entrances = ['fadeIn', 'fadeInDown', 'fadeInRight', 'bounceIn', 'bounceInRight',
'rotateIn', 'rotateInDownLeft', 'lightSpeedIn', 'rollIn', 'bounceInDown'];
var photos = $('#photos'),
ignoreClicks = false;
$('.arrow').click(function(e, simulated){
if(ignoreClicks){
// If clicks on the arrows should be ignored,// stop the event from triggering the rest// of the handlerse.stopImmediatePropagation();
return false;
}// Otherwise allow this click to proceed,// but raise the ignoreClicks flagignoreClicks = true;
if(!simulated){
// Once the user clicks on the arrows,// stop the automatic slideshowclearInterval(slideshow);
}});
// Listen for clicks on the next arrow$('.arrow.next').click(function(e){
e.preventDefault();
// The topmost elementvar elem = $('#photos li:last');
// Apply a random exit animationelem.addClass('animated')
.addClass( exits[Math.floor(exits.length*Math.random())] );
setTimeout(function(){
// Reset the classeselem.attr('class','').prependTo(photos);
// The animation is complate!// Allow clicks again:ignoreClicks = false;
},1000);
});
// Listen for clicks on the previous arrow$('.arrow.previous').click(function(e){
e.preventDefault();
// The bottom-most elementvar elem = $('#photos li:first');
// Move the photo to the top, and// apply a random entrance animationelem.appendTo(photos)
.addClass('animated')
.addClass( entrances[Math.floor(entrances.length*Math.random())] );
setTimeout(function(){
// Remove the classesselem.attr('class','');
// The animation is complate!// Allow clicks again:ignoreClicks = false;
},1000);
});
// Start an automatic slideshowvar slideshow = setInterval(function(){
// Simulate a click every 1.5 seconds$('.arrow.next').trigger('click',[true]);
}, 1500);
});
CSS 样式
下面我们需要添加 CSS 样式。这里不列出所有的 CSS 代码,只列出关于堆叠图片部分的代码:
#photos{
margin:0 auto;
padding-top:120px;
width:450px;
position:relative;
}#photos li{
position:absolute;
width:450px;
height:450px;
overflow:hidden;
background-color:#fff;
box-shadow: 1px 1px 1px #ccc;
z-index:10;
-webkit-animation-duration: 1s;
-moz-animation-duration: 1s;
animation-duration: 1s;
}#photos li a{
position:absolute;
top:6px;
left:6px;
right:6px;
bottom:6px;
background-size: cover;
text-indent:-9999px;
overflow:hidden;
}
通过设置 animation-duration 属性来设置图片动画的持续时间,在 DEMO 中,我们设置为 1 秒。你还可以通过 animation-delay 来设置图片动画前的延时时间和通过设置 animation-iteration-count 来设置动画的重复次数。
| 演示地址 | 下载地址 |
专业提供WordPress主题安装、深度汉化、加速优化等各类网站建设服务,详询在线客服!
也想出现在这里?联系我们吧